
Imagine you need to run a script every night to back up your database. Or maybe you want to automatically rotate your logs every week. Cron jobs have been the go-to solution for scheduling tasks on Linux systems for decades. But Systemd timers are a modern alternative gaining popularity. Choosing the right tool for the job can significantly impact your system's reliability and your peace of mind. This tutorial will guide you through the process of deciding whether to use Cron or Systemd timers and provide practical examples of how to implement them.
Choosing the right scheduling tool matters because it directly affects the reliability and maintainability of your automated tasks. A poorly configured cron job or timer can lead to missed backups, system instability, or even security vulnerabilities. Understanding the strengths and weaknesses of each approach allows you to make informed decisions that ensure your automation runs smoothly and predictably.
Here's a quick tip: Before deploying any scheduled task to production, always test it thoroughly in a controlled environment to ensure it behaves as expected. For example, if you are unsure if a cron job will be run on a specific date/time, create one to `touch /tmp/cron_test` a few minutes into the future.
Key Takeaway: You'll learn how to effectively schedule tasks using both Cron jobs and Systemd timers, understanding their respective advantages and disadvantages, allowing you to choose the best tool for your specific automation needs.
Prerequisites
Before we dive in, let's ensure you have everything you need: A Linux system: This tutorial assumes you're using a Linux distribution that supports both Cron and Systemd (most modern distributions do). I tested this on Ubuntu 22.04. Basic command-line knowledge: You should be comfortable navigating the command line and editing text files. `sudo` privileges:Some commands require administrative privileges. Cron daemon running: Check with `sudo systemctl status cron` Systemd available: Check with `systemctl --version`
Overview of the Approach
We'll explore both Cron and Systemd timers. For each, we'll cover:
1.Basic Syntax: How to define the schedule.
2.Practical Examples: Demonstrating simple and advanced use cases.
3.Configuration: Showing where the configuration files are located and how to edit them.
4.Monitoring: Explaining how to check if your scheduled tasks are running as expected.
The workflow is simple: Define the task, schedule it using either Cron or Systemd, and then monitor its execution. We will use `echo` to write to a log file so we can easily see if the commands were run.
Step-by-Step Tutorial
Let's start with Cron jobs, the classic scheduling tool.
Cron Jobs
Basic Example: Writing to a Log File
This example creates a cron job that appends the current date and time to a log file every minute.
Code (bash)
```bash
crontab -e
```
This command opens the crontab file for the current user in your default text editor (usually `vi` or `nano`). Add the following line to the file:
```text echo "Current time: $(date)" >> /home/ubuntu/cron.log
```
Save the file and exit the editor.Output:
```text
crontab: installing new crontab
```
Explanation
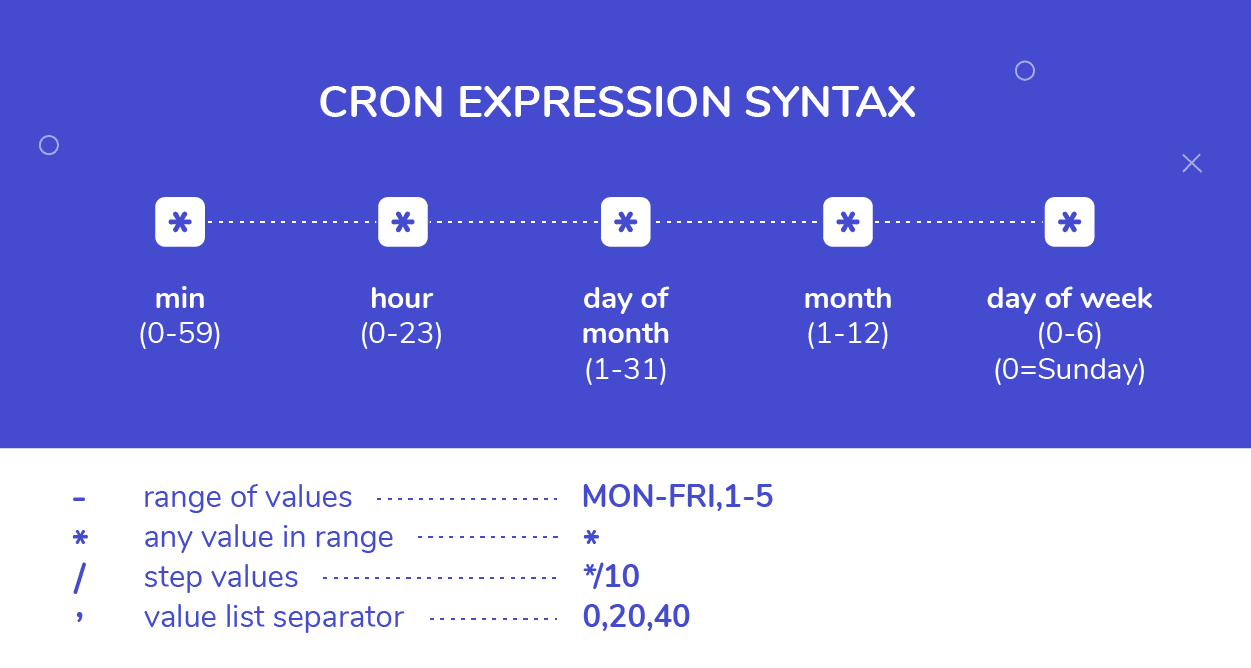
`crontab -e`: Opens the crontab file for editing. ``:Specifies that the command should run every minute (minute, hour, day of month, month, day of week). `echo "Current time: $(date)"`: The command to be executed, which prints the current date and time. `>> /home/ubuntu/cron.log`: Appends the output to the specified log file. Make sure to change `/home/ubuntu/cron.log` to your actual home directory.
Verify that the cron job is running by checking the log file:Code (bash):
```bash
tail -f /home/ubuntu/cron.log
```
You should see the date and time being appended to the file every minute.
Advanced Example: Locking, Environment Variables, and Container Execution
This example demonstrates a more robust cron job that uses locking to prevent overlapping executions, uses environment variables for configuration, and executes a command inside a Docker container.
Code (bash)
First, create a script named `backup.sh`
```bash
#!/bin/bash
Script to perform a database backup, with locking and logging.
Requires:
- LOCK_FILE environment variable
- BACKUP_DIR environment variable
Set -e to exit immediately if a command exits with a non-zero status.
set -e
LOCK_FILE="${LOCK_FILE:-/tmp/backup.lock}" # Default lock file
BACKUP_DIR="${BACKUP_DIR:-/tmp/backup}" # Default backup directory
DATABASE_NAME="mydatabase"
TIMESTAMP=$(date +%Y-%m-%d_%H-%M-%S)
BACKUP_FILE="${BACKUP_DIR}/${DATABASE_NAME}_${TIMESTAMP}.sql.gz"
Ensure the backup directory exists
mkdir -p "$BACKUP_DIR"
Attempt to acquire a lock
exec 9> "$LOCK_FILE"
flock -n 9
| exit 1 # Exit if the lock cannot be acquired |
|---|
Log the start of the backup
echo "$(date) - Starting backup" >> /var/log/backup.log
Perform the backup (replace with your actual backup command)
docker exec -i my-db-container pg_dump -U postgres "$DATABASE_NAME" | gzip > "$BACKUP_FILE"
Log the completion of the backup
echo "$(date) - Backup complete: $BACKUP_FILE" >> /var/log/backup.log
Release the lock (automatically released when file descriptor 9 is closed)
echo "$(date) - Backup finished" >> /var/log/backup.log
exit 0
```
Make the script executable:
```bash
chmod +x backup.sh
```
Next, add the following cron job to your crontab:
```bash
0 2 LOCK_FILE=/tmp/my_backup.lock BACKUP_DIR=/var/backups /home/ubuntu/backup.sh
```
Explanation
`0 2`: Runs the script at 2:00 AM every day. `LOCK_FILE=/tmp/my_backup.lock BACKUP_DIR=/var/backups`: Sets the environment variables for the script. `/home/ubuntu/backup.sh`: The path to the backup script.
The `backup.sh` script uses `flock` to acquire a lock, preventing multiple instances from running simultaneously. It also logs the start and completion of the backup process to `/var/log/backup.log`, and executes the `pg_dump` command inside the `my-db-container` Docker container. Be sure to replace `/home/ubuntu/backup.sh` with the actual path to your backup script.
Check the logs and the backup directory for successful execution:Code (bash):
```bash
tail /var/log/backup.log
ls -l /var/backups/
```
Systemd Timers
Now, let's explore Systemd timers.
Basic Example: Writing to a Log File
This example creates a Systemd timer that appends the current date and time to a log file every minute, similar to the Cron example.
Code (bash)
First, create a service file named `my-timer.service`:
```text
[Unit]
Description=My Simple Timer Service
[Service]
Type=oneshot
Exec Start=/bin/bash -c 'echo "Current time: $(date)" >> /home/ubuntu/systemd.log'
```
Save the file as `/etc/systemd/system/my-timer.service`. Be sure to change `/home/ubuntu/systemd.log` to your actual home directory.
Next, create a timer file named `my-timer.timer`:
```text
[Unit]
Description=Run my-timer.service every minute
[Timer]
On Calendar=*: :00/1
Unit=my-timer.service
[Install]
Wanted By=timers.target
```
Save the file as `/etc/systemd/system/my-timer.timer`.
Enable and start the timer:
```bash
sudo systemctl enable my-timer.timer
sudo systemctl start my-timer.timer
```
Output
```text
Created symlink /etc/systemd/system/timers.target.wants/my-timer.timer → /etc/systemd/system/my-timer.timer.
```
Explanation
`my-timer.service`: Defines the service to be executed. `Type=oneshot` indicates that the service executes once and then stops. `Exec Start` specifies the command to run. `my-timer.timer`: Defines the timer that triggers the service. `On Calendar=*: :00/1` specifies that the service should run every minute. `Unit=my-timer.service` links the timer to the service. `sudo systemctl enable my-timer.timer`: Enables the timer, so it starts on boot. `sudo systemctl start my-timer.timer`: Starts the timer immediately.
Verify that the timer is running by checking the log file:Code (bash):
```bash
tail -f /home/ubuntu/systemd.log
```
You should see the date and time being appended to the file every minute.
Advanced Example: Locking, Environment Variables, and Script Execution
This example demonstrates a more advanced Systemd timer that uses locking, environment variables, and executes a separate script.
Code (bash)
First, create a service file named `backup-advanced.service`:
```text
[Unit]
Description=Advanced Backup Service
Requires=network.target # Uncomment if your script requires network access
After=network.target # Ensure network is up before starting
[Service]
Type=oneshot
Environment File=/etc/sysconfig/backup_env # Load environment variables from file
Exec Start=/usr/local/bin/backup-script.sh # Execute the backup script
```
Save the file as `/etc/systemd/system/backup-advanced.service`. Uncomment the `Requires=` and `After=` lines if your script requires network access.
Create a script named `backup-script.sh`:
```bash
#!/bin/bash
Script to perform a database backup, with locking and logging.
Reads env vars from /etc/sysconfig/backup_env
set -e # Exit on error
LOCK_FILE="${LOCK_FILE}"
BACKUP_DIR="${BACKUP_DIR}"
DATABASE_NAME="mydatabase"
TIMESTAMP=$(date +%Y-%m-%d_%H-%M-%S)
BACKUP_FILE="${BACKUP_DIR}/${DATABASE_NAME}_${TIMESTAMP}.sql.gz"
Ensure the backup directory exists
mkdir -p "$BACKUP_DIR"
Acquire lock using flock
exec 9> "$LOCK_FILE"
flock -n 9
| exit 1 # Exit if the lock cannot be acquired |
|---|
Log the start of the backup
echo "$(date) - Starting backup" >> /var/log/backup.log
Perform the backup (replace with your actual backup command)
Replace with your database backup command, e.g., pg_dump
pg_dump -U postgres "$DATABASE_NAME" | gzip > "$BACKUP_FILE"
Log the completion of the backup
echo "$(date) - Backup complete: $BACKUP_FILE" >> /var/log/backup.log
Release the lock
echo "$(date) - Backup finished" >> /var/log/backup.log
```
Save the script as `/usr/local/bin/backup-script.sh` and make it executable:
```bash
sudo chmod +x /usr/local/bin/backup-script.sh
```
Create the environment file `/etc/sysconfig/backup_env`:
```text
LOCK_FILE=/tmp/my_backup.lock
BACKUP_DIR=/var/backups
```
Set appropriate permissions on the environment file:
```bash
sudo chmod 600 /etc/sysconfig/backup_env
```
Create a timer file named `backup-advanced.timer`:
```text
[Unit]
Description=Run Advanced Backup Service Daily
[Timer]
On Calendar=02:00:00 # Run at 2:00 AM daily
Persistent=true # Start the timer if it missed its schedule
Unit=backup-advanced.service
[Install]
Wanted By=timers.target
```
Save the file as `/etc/systemd/system/backup-advanced.timer`.
Enable and start the timer:
```bash
sudo systemctl enable backup-advanced.timer
sudo systemctl start backup-advanced.timer
```
Explanation
`backup-advanced.service`: Defines the service to be executed. It sources environment variables from `/etc/sysconfig/backup_env` and executes the `backup-script.sh` script. `backup-script.sh`: The script performs the actual backup, including locking and logging. `backup-advanced.timer`: Defines the timer that triggers the service. `On Calendar=02:00:00` specifies that the service should run at 2:00 AM daily. `Persistent=true` ensures that if the system was offline during the scheduled time, the timer will run the service as soon as the system comes back online. `sudo systemctl enable backup-advanced.timer`: Enables the timer, so it starts on boot. `sudo systemctl start backup-advanced.timer`: Starts the timer immediately.
Check the logs and the backup directory for successful execution:Code (bash):
```bash
tail /var/log/backup.log
ls -l /var/backups/
```
Use-case scenario
Imagine you're responsible for maintaining a web server that generates a large number of log files daily. You need to rotate these logs automatically to prevent them from filling up the disk. You could use either a Cron job or a Systemd timer to schedule a script that compresses and archives the old log files every night.
Real-world mini-story
A junior sysadmin, Sarah, was struggling with unreliable backups using Cron. Sometimes the server would be too busy and the backup job would overlap with the next scheduled run. She switched to a Systemd timer with the `Persistent=true` option and implemented locking in her backup script. This solved her overlapping job issue and ensured backups always ran, even if the server was occasionally down during the scheduled time.
Best practices & security
File Permissions: Ensure scripts are executable only by the owner (`chmod 700 script.sh`). Configuration files (like `/etc/sysconfig/backup_env`) should be readable only by root (`chmod 600 config`). Avoiding Plaintext Secrets: Don't store passwords or sensitive information directly in scripts or configuration files. Use environment variables loaded from files with restricted permissions, or use a secret management tool. Limiting User Privileges: Run scripts under a dedicated user account with minimal privileges, rather than as root. Log Retention: Implement a log rotation policy to prevent log files from growing indefinitely. Timezone Handling: Use UTC for server time to avoid issues with daylight saving time. Explicitly set the `TZ` environment variable if needed. Locking: Use `flock` or other locking mechanisms to prevent concurrent execution of jobs.
Troubleshooting & Common Errors
Cron Job Not Running: Check the system logs (`/var/log/syslog` or `/var/log/cron`) for errors. Ensure the cron daemon is running (`sudo systemctl status cron`). Verify the cron syntax is correct using `crontab -l`. Systemd Timer Not Triggering: Check the timer status (`sudo systemctl status my-timer.timer`) and the service status (`sudo systemctl status my-timer.service`). Examine the journal logs (`journalctl -u my-timer.service`). Ensure the timer is enabled (`sudo systemctl is-enabled my-timer.timer`). Script Fails with "Permission Denied": Ensure the script is executable (`chmod +x script.sh`) and that the user running the script has the necessary permissions to access the files and directories it uses. Environment Variables Not Set: For Cron, ensure environment variables are set directly in the crontab or sourced from a file. For Systemd, use the `Environment File` directive or set environment variables directly in the service file.
Monitoring & Validation
Cron:
Check the system logs (`/var/log/syslog` or `/var/log/cron`) for job execution and errors.
Use `grep` to find specific job runs in the logs: `grep "backup.sh" /var/log/syslog`
Monitor the output of the job (e.g., the backup log file) for errors. Systemd:
Check the timer status: `sudo systemctl status my-timer.timer`
Check the service status: `sudo systemctl status my-timer.service`
View the journal logs: `journalctl -u my-timer.service`
Implement alerting based on job exit codes or log messages.
Alternatives & scaling
Cron: Simple, widely available, but lacks advanced features like dependency management and precise timing. Systemd Timers: More powerful and flexible, offering features like persistent timers and dependency management. Better integrated with systemd logging. Kubernetes Cron Jobs: Ideal for scheduling containerized tasks in a Kubernetes cluster, offering scalability and fault tolerance. CI Schedulers (e.g., Jenkins, Git Lab CI): Suitable for scheduling tasks as part of a continuous integration/continuous deployment pipeline.
FAQ
What are the key differences between Cron and Systemd timers?
Cron is simpler to configure for basic scheduling but lacks features like dependency management and precise timing. Systemd timers offer more advanced features, better logging integration, and persistent timers.
When should I use Cron vs. Systemd timers?
Use Cron for simple, straightforward scheduling needs. Use Systemd timers for more complex tasks that require precise timing, dependency management, or persistent timers.
How do I handle timezones with Cron and Systemd timers?
For Cron, it's best to configure the system's timezone to UTC. For Systemd, you can set the `TZ` environment variable in the service file.
How can I prevent overlapping jobs?
Use locking mechanisms like `flock` in your scripts to ensure that only one instance of the job is running at a time.
How do I check the status of a Systemd timer?
Use the command `sudo systemctl status your-timer.timer`.
Conclusion
Congratulations! You've now learned how to schedule tasks using both Cron jobs and Systemd timers. You understand their strengths and weaknesses and can choose the right tool for your specific needs. Remember to test your scheduled tasks thoroughly and implement proper security measures to ensure your automation runs reliably and securely. Now go and automate all the things!