
Scheduling tasks on Linux systems can often feel like a dark art. You need something to run automatically, but how do you ensure it happens reliably and without manual intervention? That's where cron jobs come in. Cron is a time-based job scheduler in Unix-like operating systems, and mastering it is essential for any developer, system administrator, or Dev Ops engineer. If you want to automate routine tasks, schedule backups, or run scripts at specific intervals, then cron is your friend.
Cron jobs provide a powerful and reliable way to automate repetitive tasks. Automating tasks with cron reduces human error, ensures tasks run on time, and frees up your time for more strategic work. Incorrectly configured cron jobs, however, can lead to unexpected system behavior, data corruption, or even security vulnerabilities. Therefore, understanding how cron works, how to configure it correctly, and how to monitor its activity is paramount for system reliability and security.
Here's a quick tip to get started: Open your crontab editor with `crontab -e`, then add a line like `echo "Hello Cron!" > /tmp/cron_output.txt`. Wait a minute or two, then check the contents of `/tmp/cron_output.txt`. You've just run your first cron job!
Key Takeaway: This tutorial provides a comprehensive guide to using cron jobs, empowering you to automate tasks, schedule scripts, and manage system processes effectively and securely. You'll learn how to create, manage, and troubleshoot cron jobs, ensuring your systems run smoothly and efficiently.
Prerequisites
Before diving into cron jobs, make sure you have the following: A Linux or Unix-like operating system: This tutorial assumes you're using a system like Ubuntu, Debian, Cent OS, mac OS, or similar. Basic command-line knowledge: Familiarity with navigating directories, editing files, and running commands. `cron` service installed:Most systems have cron installed by default. You can check with `systemctl status cron` (on systemd-based systems). If it's not installed, use your distribution's package manager (`apt install cron` for Debian/Ubuntu, `yum install cronie` for Cent OS/RHEL). Text editor: You'll need a text editor to edit cron files. `nano`, `vim`, or `emacs` are common choices. You can set your preferred editor by setting the `EDITOR` environment variable (`export EDITOR=nano`). Permissions: You will need user-level access to create cron jobs for your own account. System-wide cron jobs usually require `sudo` privileges.
Overview of the Approach
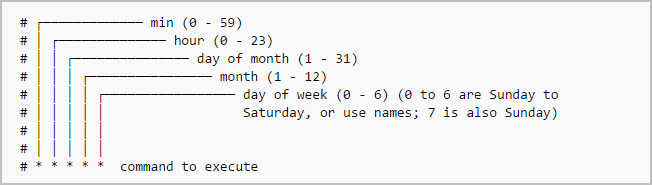
The cron daemon reads instructions from crontab (cron table) files. Each line in a crontab file represents a cron job. The cron daemon wakes up every minute, checks all the crontab files, and executes any jobs that are scheduled for that minute. A typical crontab entry consists of six fields: minute, hour, day of month, month, day of week, and the command to execute.
Here’s a simplified visual representation of the cron workflow:
1.User edits crontab file: Using `crontab -e`.
2.Cron daemon reads crontab: Parses the schedule and commands.
3.Cron daemon executes job: At the scheduled time.
4.Output/errors logged: Usually to system logs or a user-specified file.
Step-by-Step Tutorial
Let's start with a simple example to get you comfortable with creating and managing cron jobs.
Example 1: Simple Cron Job - Write Timestamp to File
This example creates a cron job that writes the current date and time to a file every minute.
Code (bash)
```bash
crontab -e
```
Add the following line to the crontab file (use `nano`, `vim`, or your editor of choice):
```text date >> /tmp/cron_timestamp.txt
```
Save the file and exit the editor.
Explanation
`crontab -e`: Opens the crontab file for the current user in your default text editor. ``:These five asterisks represent the schedule. In this case, they mean "every minute of every hour of every day of every month of every day of the week." `date`: This is the command that will be executed. In this case, it simply prints the current date and time. `>> /tmp/cron_timestamp.txt`: This redirects the output of the `date` command and appends it to the file `/tmp/cron_timestamp.txt`.
Output
After a few minutes, check the contents of the file:
```bash
cat /tmp/cron_timestamp.txt
```
You should see output similar to this:
```text
Fri Oct 27 14:35:01 UTC 2023
Fri Oct 27 14:36:01 UTC 2023
Fri Oct 27 14:37:01 UTC 2023
```
Explanation
Each line represents a timestamp written by the cron job every minute.
Now, let's clean up this test cron job by removing it:
```bash
crontab -e
```
Delete the line you added and save the file.
Example 2: More Robust Cron Job - Locking, Logging, and Environment Variables
This example demonstrates a more robust cron job that includes locking to prevent overlapping runs, logging to track execution, and the use of environment variables for configuration. This is closer to a production-ready cron setup.
Code (bash)
First, create a script named `backup_script.sh`:
```bash
nano /home/ubuntu/backup_script.sh
```
Add the following content to the script:
```bash
#!/bin/bash
#
Script to backup a directory
Requires: BACKUP_SOURCE, BACKUP_DESTINATION environment variables
Set -e to exit immediately if a command exits with a non-zero status
set -e
Define lock file path
LOCK_FILE="/tmp/backup_script.lock"
Check if another instance is already running
if flock -n 9; then
# Acquire the lock
echo "Starting backup at $(date)" >> /var/log/backup.log
# Perform the backup using rsync
rsync -av "$BACKUP_SOURCE" "$BACKUP_DESTINATION" >> /var/log/backup.log 2>&1
echo "Backup finished at $(date)" >> /var/log/backup.log
# Release the lock
flock -u 9
else
echo "Another instance is already running. Exiting." >> /var/log/backup.log
exit 1
fi
```
Make the script executable:
```bash
chmod +x /home/ubuntu/backup_script.sh
```
Now, configure the environment variables. You can set these directly in the crontab, but it's cleaner to put them in a separate file. Create a file named `.backup_env` in your home directory:
```bash
nano /home/ubuntu/.backup_env
```
Add the following lines (replace with your actual source and destination paths):
```text
BACKUP_SOURCE="/home/ubuntu/source_directory"
BACKUP_DESTINATION="/home/ubuntu/backup_directory"
```
Ensure that ONLY the user running the cron job can read/write the file:
```bash
chmod 600 /home/ubuntu/.backup_env
```
Create source and destination directories:
```bash
mkdir -p /home/ubuntu/source_directory
mkdir -p /home/ubuntu/backup_directory
```
Create a test file in the source directory:
```bash
touch /home/ubuntu/source_directory/test_file.txt
```
Finally, add the cron job entry:
```bash
crontab -e
```
Add the following line to your crontab:
```text . /home/ubuntu/.backup_env && /home/ubuntu/backup_script.sh
```
Explanation
`#!/bin/bash`: Shebang line specifying the script interpreter. `set -e`: Ensures that the script exits immediately if any command fails. `LOCK_FILE="/tmp/backup_script.lock"`: Defines the path to the lock file. `flock -n 9`: Attempts to acquire a lock on file descriptor 9. The `-n` option makes it non-blocking, so it fails immediately if the lock is already held. `flock` prevents multiple instances of the script from running simultaneously. This is CRUCIAL for data integrity in long running jobs. `echo "Starting backup at $(date)" >> /var/log/backup.log`: Logs the start time of the backup. `rsync -av "$BACKUP_SOURCE" "$BACKUP_DESTINATION" >> /var/log/backup.log 2>&1`: Performs the backup using `rsync`. The `-a` option preserves permissions and other attributes, and `-v` enables verbose output. `2>&1` redirects both standard output and standard error to the log file. `echo "Backup finished at $(date)" >> /var/log/backup.log`: Logs the completion time of the backup. `flock -u 9`: Releases the lock. `. /home/ubuntu/.backup_env`: Sources the environment variable file, setting the `BACKUP_SOURCE` and `BACKUP_DESTINATION` variables. This approach isolates the job dependencies. `&&`: Ensures that the script only runs if the environment variables are sourced successfully.
Output
After a minute, check the log file:
```bash
cat /var/log/backup.log
```
You should see output similar to this:
```text
Starting backup at Fri Oct 27 14:45:01 UTC 2023
sending incremental file list
./
test_file.txt
sent 154 bytes received 35 bytes 378.00 bytes/sec
total size is 0 speedup is 0.00
Backup finished at Fri Oct 27 14:45:01 UTC 2023
```
Also, check the backup directory:
```bash
ls /home/ubuntu/backup_directory
```
You should see the `test_file.txt` file.
Use-case scenario
A common use case for cron jobs is to automate nightly database backups. A script could be scheduled to run every night at midnight, backing up the database to a secure location. This ensures that a recent backup is always available in case of data loss or system failure.
Real-world mini-story
Sarah, a Dev Ops engineer, was struggling with inconsistent log rotation on her team's servers. Some servers rotated logs correctly, while others didn't, leading to disk space issues. By implementing a standardized cron job across all servers, she ensured that logs were rotated consistently and reliably, resolving the disk space problems and improving system stability.
Best practices & security
File permissions: Ensure that your scripts are only executable by the owner and that the crontab file is only writable by the owner. Use `chmod 700
Post a Comment